
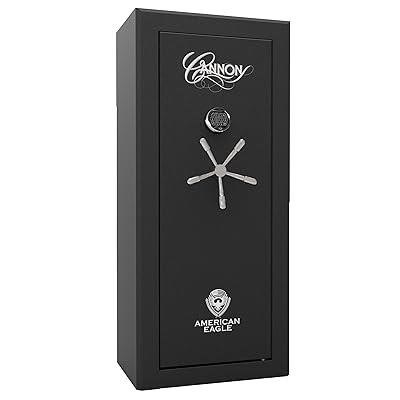
cannon gun safe owner’s manual
Cannon Gun Safe Owners Manual⁚ A Comprehensive Guide
This manual provides comprehensive instructions for your Cannon gun safe. Learn about its various locking mechanisms, including mechanical, electronic, and combination locks. Discover how to program codes, troubleshoot issues, maintain functionality, and access online resources and customer support. Ensure safe and secure use of your valuable asset.
Understanding Your Safe’s Locking Mechanisms
Your Cannon gun safe likely employs a sophisticated multi-locking system for enhanced security. Understanding each component is crucial for proper operation and maintenance. The most common types include mechanical, electronic, and combination locks, often working in concert. The mechanical lock, typically a dial-type combination lock, offers a robust and reliable backup system, independent of power. The electronic lock provides convenience through digital code entry, often with features like programmable access codes and audible alerts. Lastly, the combination lock, whether mechanical or electronic, adds another layer of security by requiring a specific sequence of numbers or actions to unlock the safe. Knowing how these systems interact is key to preventing issues and ensuring the safe’s continued functionality. This knowledge empowers you to utilize your safe’s security features effectively and respond to any unexpected problems. Refer to the specific instructions for your model for detailed diagrams and operational guidelines.
Mechanical Lock Operation and Maintenance
The mechanical lock on your Cannon safe is a crucial security feature. Understanding its operation is vital for safe and efficient use. To open, carefully dial the combination, turning slowly and steadily in the correct direction. Avoid rapid movements or reversing direction mid-combination, as this may cause the lock to bind or jam. Regular lubrication is key to maintaining the lock’s smooth operation. Use a high-quality lock lubricant, applied sparingly to moving parts. Avoid excessive lubrication, which can attract dust and debris. Periodically inspect the lock for any signs of wear or damage, such as loose components or scratches on the dial. If you notice any issues, consult a qualified locksmith or contact Cannon Safe customer service for assistance. Remember, attempting repairs without proper knowledge could compromise the security of your safe. Proper maintenance will ensure the longevity and reliable performance of your safe’s mechanical locking system, providing years of dependable protection for your valuables.
Electronic Lock Programming and Troubleshooting
Your Cannon safe’s electronic lock offers advanced security features, but proper programming and troubleshooting knowledge are essential. Initially, the safe may have a factory-set code (often 1-2-3-4-5-6), which should be changed immediately for enhanced security. The programming process usually involves entering the current code, then following the prompts to set a new, personalized code. Remember to choose a code that’s easy for you to remember but difficult for others to guess. Avoid using common sequences like birthdays or anniversaries. If you encounter issues, such as an incorrect code entry or a malfunctioning keypad, consult the troubleshooting section of your manual. Common problems might include low battery indicators (often signaled by repeated beeps), which require battery replacement. If the problem persists, ensure the keypad is clean and free from obstructions. If you’re still unable to resolve the issue, contact Cannon Safe’s customer service for assistance. They can provide expert guidance and potentially arrange repair or replacement if needed. Always refer to your specific safe’s model manual for detailed instructions and troubleshooting steps.
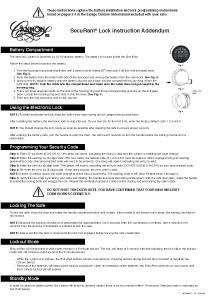
Combination Lock Setup and Code Changes
Many Cannon safes utilize combination locks, offering a high level of security. The initial setup often involves a factory-preset code (commonly 1-2-3-4-5-6), which must be changed immediately upon receiving your safe. This is crucial for preventing unauthorized access. To change the combination, you’ll typically need to follow a specific sequence of steps. First, open the safe using the factory code. Then, locate the combination dial and follow the instructions in your manual to enter the old code and subsequently set a new one. Remember, accuracy is paramount. Slowly and deliberately turn the dial to the correct numbers, avoiding any abrupt movements or backtracking. If an error is made during code entry, reset the lock and start again from the beginning. Choose a new combination that is memorable to you but difficult for others to guess. Avoid easily guessable sequences such as birthdays, anniversaries, or simple numerical patterns. After changing the combination, test it several times to ensure it functions correctly. Keep a record of your new combination in a secure, separate location, away from the safe itself. If you forget your combination, contacting Cannon Safe’s customer service might be necessary for assistance. Always refer to your manual for model-specific instructions.
Factory Preset Code and Security Best Practices
Your Cannon safe likely ships with a factory-preset combination, often a simple sequence like 1-2-3-4-5-6. This is a temporary code and should be changed immediately upon receiving your safe. Failing to change this default code significantly compromises your security. The responsibility for creating and safeguarding your new combination rests solely with you. Once changed, keep your new combination in a safe place, separate from the safe itself. Avoid using easily guessable sequences, such as birthdays, anniversaries, or consecutive numbers. A strong combination incorporates a random mix of numbers to increase resistance against unauthorized access attempts. Regularly reviewing and potentially changing your combination further enhances security. Consider using a combination that’s difficult to remember without writing it down, forcing you to refer to your secure record. This layered approach increases the difficulty for intruders. When inputting your combination, do so slowly and deliberately, paying close attention to each number. Avoid hasty actions that may lead to errors and potential lockouts. Always consult your owner’s manual for model-specific instructions and best practices. Remember, a secure combination, properly changed, is the first line of defense against theft;
Important Safety Precautions and Warnings
Prior to using your Cannon gun safe, carefully review all safety instructions within this manual. Never attempt to force the lock; this can damage the mechanism and compromise security. If you encounter difficulties opening the safe, refer to the troubleshooting section or contact Cannon Safe customer service for assistance. Improper handling can lead to injury; always exercise caution when operating the safe. Children should never be left unsupervised near the safe. The safe should be installed in a stable, level location, away from direct sunlight or extreme temperatures. Ensure adequate ventilation to prevent overheating. Regularly inspect the safe for any signs of damage or wear and tear. Address any issues promptly. Remember, the safe’s weight necessitates careful handling during installation and relocation; seek assistance if needed. Avoid placing excessive weight on the safe’s top surface. Always use caution and follow the manufacturer’s guidelines for proper maintenance and operation to ensure the longevity and security of your safe. Misuse can lead to damage or malfunction, potentially compromising the safe’s ability to protect your valuables. In the event of any unusual occurrences or malfunctions, immediately discontinue use and contact Cannon Safe customer service for assistance.
Battery Replacement and Low Battery Indicators
Your Cannon safe’s electronic lock utilizes batteries, and knowing how to replace them is crucial for continued access. A low battery warning system is incorporated to alert you before the batteries fail completely. This typically manifests as repeated beeping during the unlocking process. When this occurs, promptly replace the batteries to avoid being locked out. Before replacing batteries, ensure the safe is unlocked. The battery compartment is usually located within the lock mechanism; consult the diagram in this manual for precise location. Use only the recommended battery type and size to ensure optimal performance and avoid damage to the electronic components. Incorrect battery installation could lead to malfunction. Carefully insert the new batteries, paying close attention to polarity (+ and -) markings. Once replaced, test the lock immediately to confirm functionality. Keep extra batteries on hand to facilitate quick replacement should the need arise. Regularly check the battery level, even if no warning has been issued, to prevent unexpected lockouts. Note the battery type and lifespan so you can replace them proactively. Proper battery maintenance helps ensure your safe remains accessible.
Maintaining Your Safe’s Functionality
Regular maintenance ensures your Cannon safe operates optimally and remains a reliable security solution. While Cannon safes are built to last, consistent care enhances their longevity and performance. Periodically inspect the exterior for any signs of damage or wear, such as scratches, dents, or rust. Address any issues promptly to prevent further deterioration. Lubricate the locking mechanism, following the manufacturer’s recommendations. This helps ensure smooth operation and prevents binding or jamming. The frequency of lubrication depends on usage; consult the lubrication section in this manual for specific guidance. Clean the exterior of the safe regularly with a soft, damp cloth. Avoid harsh chemicals or abrasive cleaners that could damage the finish. Do not use excessive force when opening or closing the safe door. Gentle handling prevents undue stress on the locking mechanism and hinges. Keep the interior of the safe clean and dry; Avoid storing items directly against the interior walls to ensure adequate air circulation. Regularly check the condition of the fire-resistant materials if your safe has fire protection features. Inspect gaskets and seals to ensure proper sealing to maintain fire resistance. Proactive maintenance will extend the life and reliability of your Cannon safe.
Troubleshooting Common Issues and Solutions
This section addresses common problems encountered with Cannon gun safes and provides practical solutions. If the electronic lock malfunctions, check the batteries first. Replace them if necessary, following the instructions in the battery replacement section. If the problem persists, try reprogramming the code. If you have forgotten your code and it’s a combination lock, consult the combination lock setup section for resetting procedures. If the safe door becomes difficult to open or close, inspect the hinges and locking bolts for any obstructions or damage. Lubricate the mechanism to alleviate stiffness, ensuring smooth operation. If the mechanical lock jams, avoid excessive force. Attempt gentle manipulation while referring to the mechanical lock operation section for guidance. For persistent issues, contact Cannon Safe customer service for expert assistance. Remember, attempting forceful entry can cause damage. If the safe is not responding to any input, check the power supply or batteries and ensure connections are secure. Before contacting support, try the basic troubleshooting steps outlined here. If the problem continues, detailed information, including the safe model number and a description of the issue, will expedite the resolution process by Cannon Safe’s support team.
Accessing Online Resources and Support
Cannon Safe offers a wealth of online resources to assist you with your safe. Their website provides access to downloadable owner’s manuals, troubleshooting guides, and frequently asked questions (FAQs). These resources offer detailed information on various safe models and their features, providing solutions to common problems. The website’s search function is intuitive, helping you quickly find information specific to your safe’s model number. Videos demonstrating safe operation and maintenance are also often available, offering visual guidance. For more personalized assistance, the website typically includes contact information for Cannon Safe’s customer support team. You can often find contact details for email, phone, and potentially live chat support. These channels allow you to ask questions about specific problems or request further clarification on instructions. Remember to have your safe’s model number readily available when contacting customer support. This information will help them quickly identify your safe’s specifications and provide appropriate assistance. Proactive use of these online resources can often resolve issues before needing direct support contact, streamlining the problem-solving process.
Contacting Cannon Safe Customer Service
Should you encounter difficulties with your Cannon gun safe that you cannot resolve using the online resources, contacting Cannon Safe’s customer service department is your next step. Their dedicated support team is trained to address a wide range of inquiries, from simple operational questions to more complex technical issues. Before contacting them, gather relevant information, such as your safe’s model number and serial number. This information significantly speeds up the troubleshooting process. You can typically find the contact information—phone number, email address, or mailing address—on the Cannon Safe website or within your owner’s manual. When contacting customer service, clearly and concisely explain the problem you’re experiencing. Provide as much detail as possible, including any error messages displayed on your safe’s electronic lock (if applicable). Be prepared to describe the steps you’ve already taken to try and resolve the issue. Cannon Safe’s customer service representatives aim to provide prompt and helpful assistance. They may offer troubleshooting advice over the phone or guide you through specific steps. If the problem requires more in-depth analysis or repair, they may direct you to an authorized service center or arrange for a service technician to visit. Maintaining a record of your interactions with customer service, including dates, times, and the names of the representatives you spoke with, can be helpful for future reference.